Roadmaps
These subsections provide a suggested order of activities for different kinds of stakeholders approaching EMT model interoperability.
Users
This roadmap applies to stakeholders that primarily run EMT simulations. It’s also a good starting point for developers to become familiar with content of the open-source software.
Installation - Windows of the Python code and testing from the Quick Start - Windows are prerequisites.
Consider whether to download MATPOWER for the power flow examples. This is open-source software that runs in open-source Octave, or in MATLAB.
Consider whether to download ATP for the EMT examples. This is free-to-use, but has restrictive license terms. Utilities, researchers, and some consultants are generally able to license ATP, but generally not EMT tool developers.
Contributors are invited to provide examples that run in other EMT simulators.
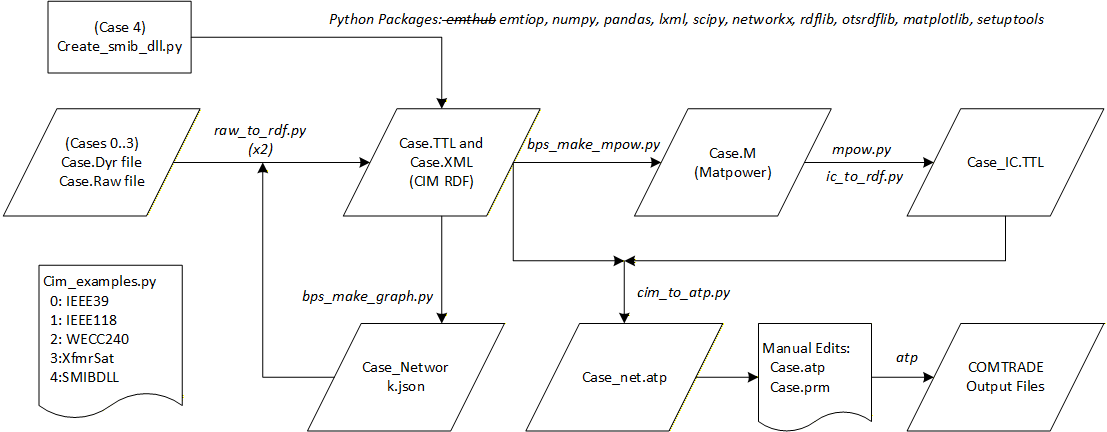
Run the five cases in Network Examples using the following scripts.
This batch file extracts all five examples to CIM RDF, with ATP and MATPOWER netlisting. It also solves four examples in MATPOWER:
@echo off
for /L %%i in (0,1,3) do (
    emthub-extract-case %%i
    python raw_to_rdf.py %%i
    python bps_make_mpow.py %%i
    python mpow.py %%i
    python ic_to_rdf.py %%i
    python cim_to_atp.py %%i
    )
emthub-extract-case 4
python create_smib_dll.py 4
python cim_to_atp.py 4
python cim_summary.py
The last command summarizes CIM class counts in each example.
This batch file runs all five examples in ATP. In this version, plots are saved in png format so the batch file continues uninterrupted:
@echo off
for /L %%i in (0,1,4) do (
    python atp.py %%i "run"
    python atp.py %%i "convert"
    python atp.py %%i "png"
    )
With a MATPOWER installation, you should obtain summary power flow output with bus voltages usually in the range 0.95 to 1.05 per-unit. However, the XfmrSat example has low initial voltage at the load end of the line. The WECC240 case has a few dozen overloaded branches. The SMIBDLL example initializes from zero, so MATPOWER is not used with it.
With an ATP installation, you should be able to match the outputs in Network Examples.
Profile Maintainers
This roadmap applies to stakeholders that primarily manage CIM UML and profiles. They do not necessarily run EMT simulations.
Users Roadmap is a pre-requisite.
The CIM UML, which includes version 18v15 of the Grid package, should be obtained from the CIM Users Group. Look for Draft CIM Model Releases and then a 48-MB zip file that includes Grid18v15 in the file name. Download that to your hard drive and unzip it.
A UML editing tool is suggested for exploring and extending the CIM UML. Chapter 10 of the CIM Modeling Guide provides advice on this topic.
To create and update profiles, document profiles, produce SQL data definition scripts, and check CIM RDF instance files against a profile, you need the open-source CIMTool.
These files, tools, and on-line documents provide the initial knowledge base to perform segments of the workflow shown below. In the upper left, the file CIM_Grid_18v15.xmi [1] has been reduced in size, by deleting the unnecesary (for EMT) Enterprise and Market packages. For CIMTool, it was also necessary to delete profile packages distributed within the base CIM file by the CIM Users Group. The three shaded files are key items maintained on the open-source software site for P3743:
Emtiop.xmi contains the CIM extensions for EMT, output from the UML editor and input to CIMTool. This file is relatively small and kept under version control. It should be possible to use this extension file with future versions of the base CIM. The format is a variant of xml.
emtiop.owl is the profile for EMT. This is created by selecting classes and attributes from the base CIM with extensions in CIMTool. You should check example CIM RDF instance files, some of them listed at the lower left, against the profile and resolve any errors.
emtiop.html documents the classes and attributes used in the profile for EMT. It is built automatically from CIMTool and included in this on-line documentation as part of CIM Extension and Profile.
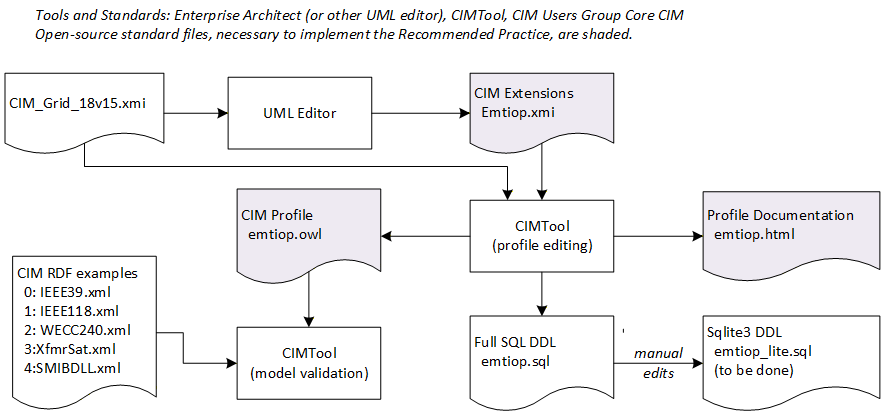
For use with SQL implementations, CIMTool also produces emtiop.sql to define SQL tables. This doesn’t work for Python’s sqlite3 package; manual editing is necessary to add foreign keys at the same time as tables are created. This is not necessary if using CIM RDF implementations.
CIMTool stores its files in a “workspace” under its local installation. Any files imported into CIMTool will be copied into this workspace. Once the files are copied, it’s recommended to let CIMTool manage the workspace files itself. CIMTool began as an Eclipse plugin, and has since been more conveniently packaged as a standalone installation. The following steps illustrate a successful sequence of importing the schema, importing the profile from version control, and checking one of the example instance files against the profile.
Extract the Repository if you haven’t already.
Start CIMTool. Version 2.3.0 RC11 was used in this demonstration.
Use the File/New/CIMTool Project menu command.
On the page New CIMTool Project, name the project twoxmi. It will typically create the workspace in C:\CIMTool-2.3.0-RC11\workspace\twoxmi. Click Next >.
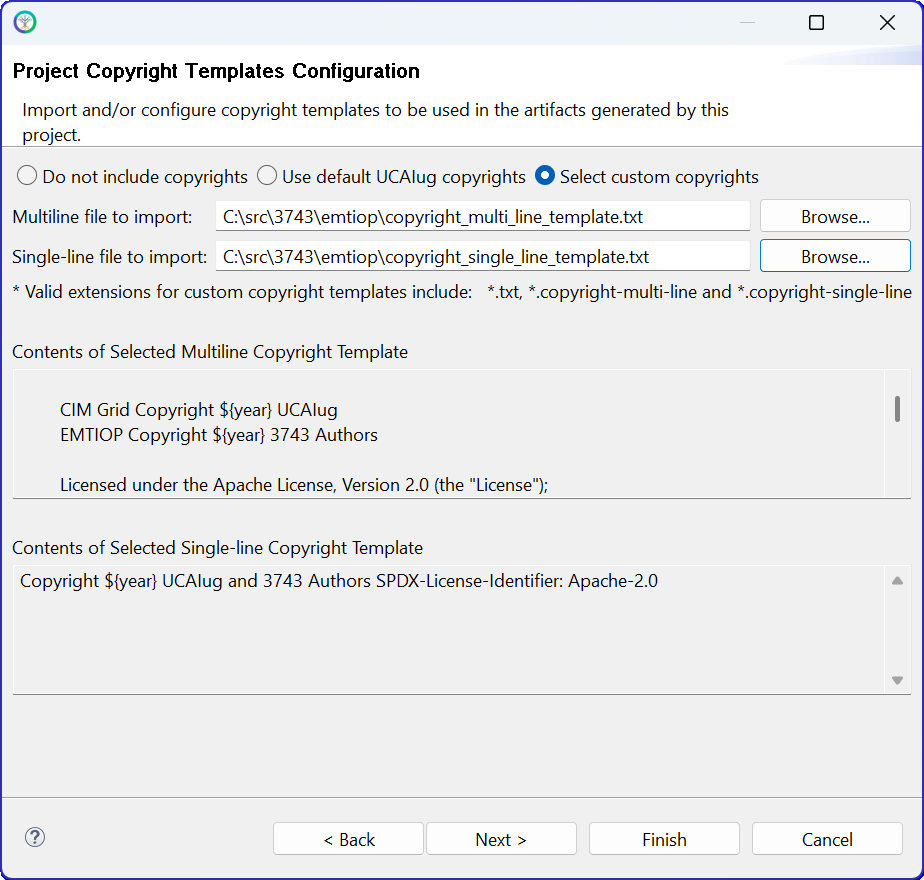
On the page Project Copyright Templates Configuration, click the option Select custom copyrights. Browse to the multi-line and single-line template files, as provided in the emtiop subdirectory of this repository, as shown below. Then click Next >.
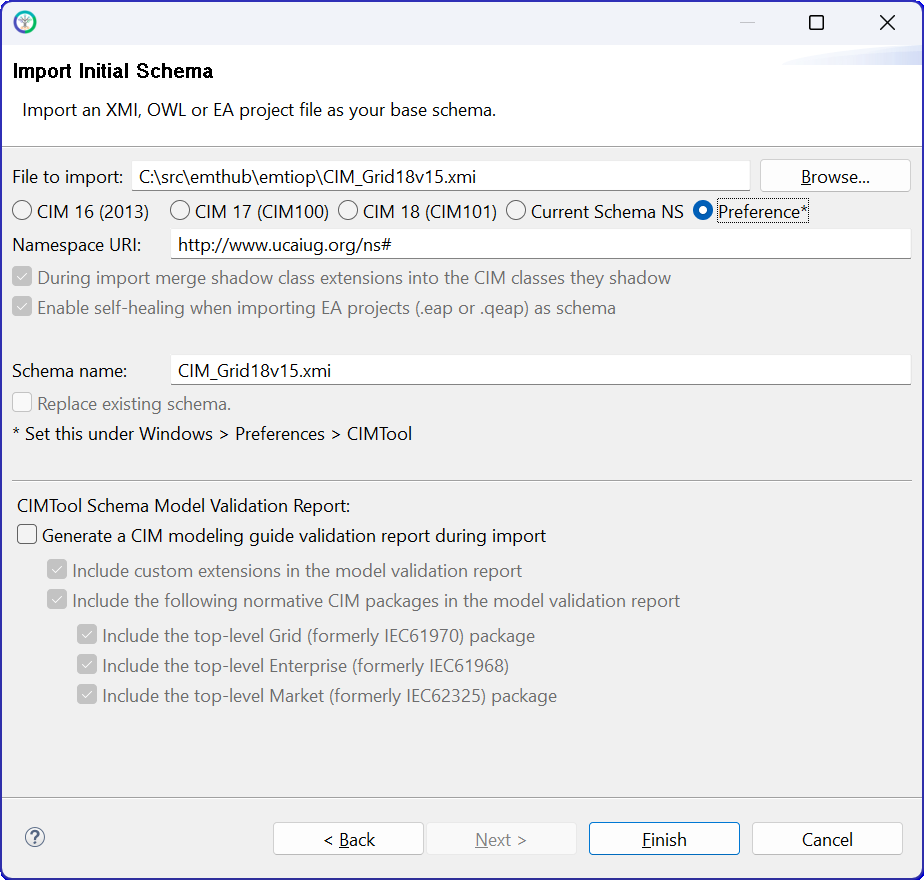
On the page Import Initial Schema:
Browse to the CIM_Grid_18v15.xmi file containing the base CIM schema, which includes the Grid18v15 package.
Enter the Namespace URI as http://www.ucauig.org/grid18v15#.
Leave the During import merge shadow class extensions and Enable self-healing options checked if possible (these may be grayed out).
Turn off the CIMTool Schema Model Validation Report.
The page should look similar to the screen shot below. Click Finish.
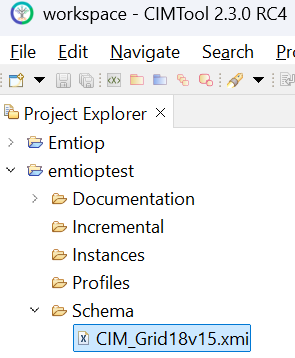
The Project Explorer should show the imported CIM base schema, as shown below.
Use either the archived CIM extensions in Emtiop.xmi, or export your own Emtiop.xmi from the UML editing tool (EA or an alternative). This same procedure was used to create the base CIM_Grid_18v15.xmi file.
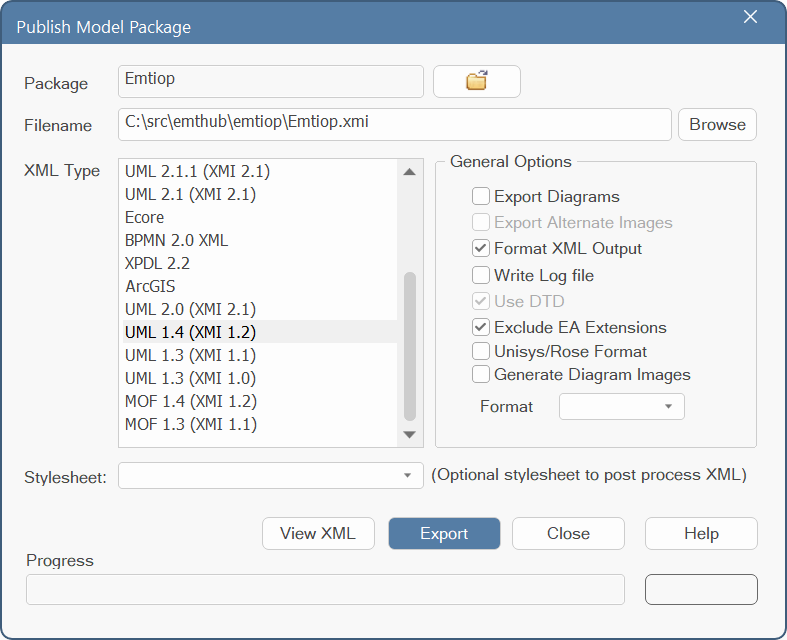
In EA, select the <<CIMExtension>> Emtiop* pacakge in the Browser, Project tab on the left-hand side of the application.
Invoke the Export / Other Formats menu command from the Publish tab in the ribbon.
Select the UML 1.4 (XMI 1.2) export type.
Select only the Format XML Output and Exclude EA Extensions options. Your dialog should be similar to that shown below. Verify that the Package at the top is Emtiop. Verify that Filename shows your desired output file.
Click Export and then you may exit EA
The next step is to add the CIM extension xmi file to the base CIM xmi file in CIMTool.
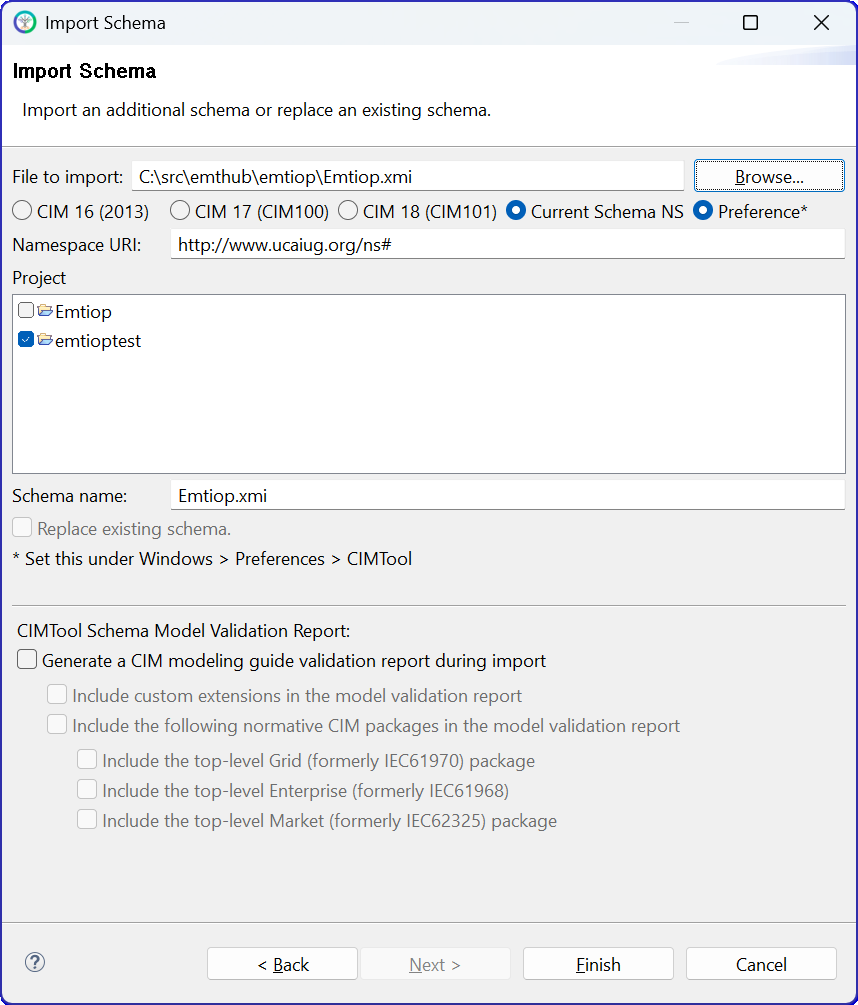
Right-click on the Schema item under the twoxmi workspace in Project Explorer. Click Import on the pop-up menu and then select Import Schema, as shown below.

Click Next to bring up the Import Schema page, similar to item 6. Leave the options as before, but browse to Emtiop.xmi in your local copy of the GitHub repository. Enter the Namespace URI as http://opensource.ieee.org/emtiop01v01#. The page should be similar to the screen shot below. Then click Finish.
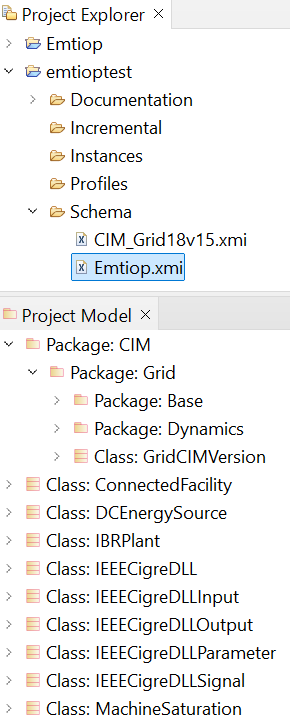
The Project Explorer and Project Browser should reflect the content of both xmi files, as shown below.
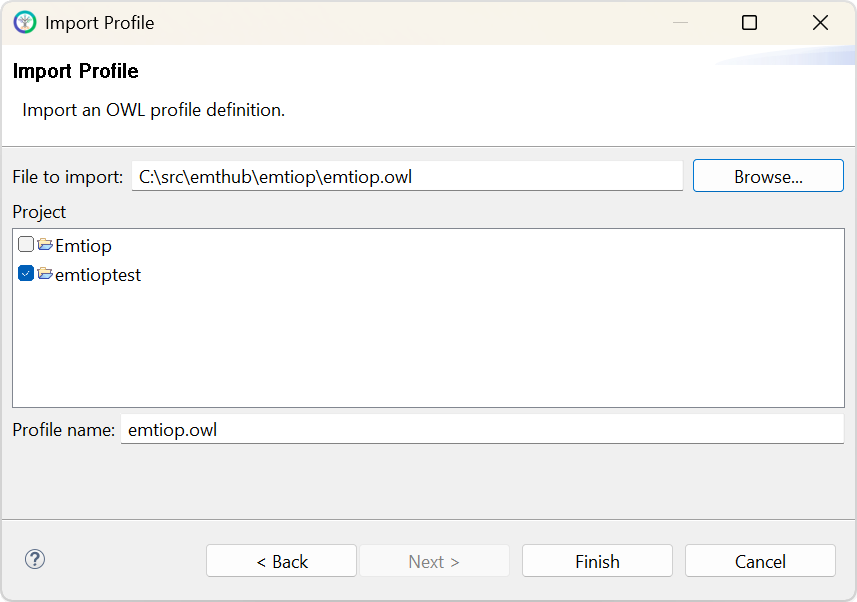
Right-click on the Profiles item under the twoxmi workspace in Project Explorer. Click Import on the pop-up menu and then select Import Profile. Click Next. This brings up the Import Profile page. Click Browse and navigate to the archived emtiop.owl file as shown below. Then click Finish.
This imports and verifies the profile against the loaded schema of base CIM with extensions. Correct any errors reported. These are generally caused by mismatches in different versions of the profile and CIM extension, which may require some iterations to resolve. The profile import should produce no errors before taking the next step.
Right-click on the Instances item under the twoxmi workspace in Project Explorer. Click Import on the pop-up menu and then select Import Model (CIM/XML file). Then click Next. This brings up the Import a Model page. Click Browse and navigate to one of the example CIM RDF files, in xml format, as shown below. [2] The Namespace URI should be left as shown. The correct check boxes for Project and Profile should be selected. Then click Next.
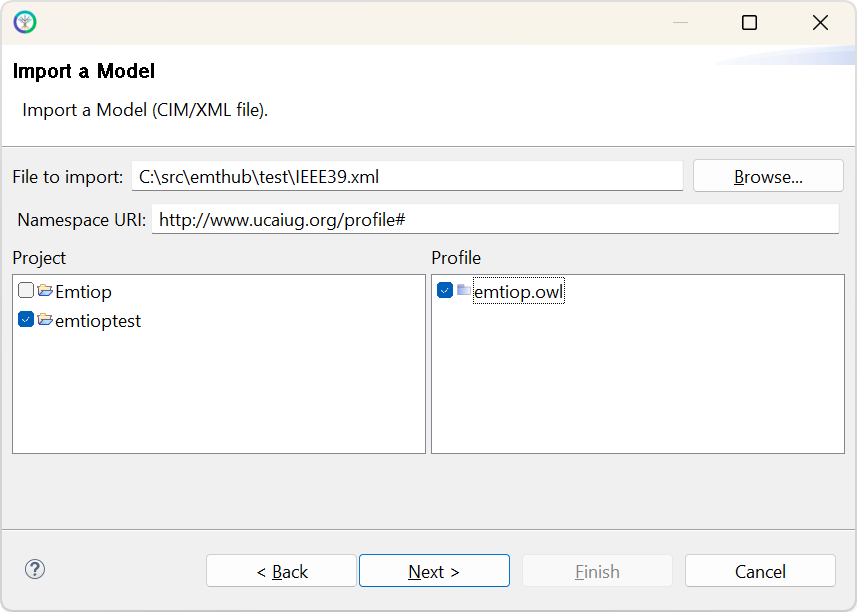
The Model Details page should have a proper Model file name filled in. If you are re-importing the same model in the process of fixing errors, select the check box to Replace existing model. For a first-time import of that model, the check box should be disabled. Click Finish.
This imports and verifies the network model against the profile, including CIM extensions. Any errors should be resolved before testing other network models, and before deploying any code. This may require iterations in the CIM extensions, the profile, and/or the code used to create the network model xml files from raw and dyr files.
From this point, please consult the CIMTool documentation and the CIM Modeling Guide for advice on how to proceed.
Network Model Developers
This roadmap applies to stakeholders that primarily import CIM network models to an EMT simulator’s native format, i.e., EMT software developers.
Users Roadmap is a pre-requisite.
Examine the create_atp.py file that creates ATP netlists. This can be a starting point for implementing other CIM importers for EMT, even without having an ATP license.
This script creates a file ending in _net.atp. That file syntax should be readable to developers familiar with EMT, even without ATP documentation. For more help, try this book. It has examples with segments of ATP input text.
The script may be found in the GitHub repository: create_atp.py.
The script may also be found in your local emthub package installation. From a Windows Command Prompt, type
pip show emthub. That will return a Location of your local emthub installation. Then you may find the ATP netlisting script at Location\emthub\create_atp.py. Using this method, you can examine other script and data files from your local emthub installation.
Become generally familiar with the CIM Extension and Profile. This is a reference, not meant to read from beginning to end.
Become generally familiar with the Queries to CIM RDF. This is also a reference, not meant to read from beginning to end.
Develop and test the CIM-to-EMT conversion script for your own EMT simulator.
Try testing the XfmrSat example first. It is the smallest example and has no generator dynamics.
Try testing the IEEE39 example next. It includes one IBR plant and some other machine dynamics..
Try testing the SMIBDLL example next. This adds the essential DLL interface to the baseline features already tested.
Try testing IEEE118 and then WECC240. These are similar to but larger than IEEE39 and they add a few more types of network model components.
Text File Import Maintainers
This roadmap applies to stakeholders that maintain or modify network model importers from text files to CIM. Currently, this package supports import from three rawfile versions through a set of API functions, with assistance from a JSON configuration file. Not all sections of the rawfile are currently supported; only the sections testable in the five Network Examples are currently supported. The number of supported rawfile versions and sections could both be increased with updates to API functions and the JSON configuration file.
The rawfile generally consists of power flow (PF) data. For dynamics data import, see the next roadmap for Dynamics Model Maintainers.
The JSON configuration file may be found in raw_mapping.json in the Repository src/emthub/queries subdirectory. It contains a dictionary of version_sections, keyed by the version number. Each version contains a dictionary of rawfile tables, keyed by the upper-case table name. The upper-case table name is expected to match the starting and ending line of a named section in the rawfile. For example, BUS is expected to match lines containing BEGIN BUS DATA and END BUS DATA in the rawfile. Part of the current raw_mapping.json configuration file is shown below.:
{
  "version_sections": {
    "35": {
      "BUS": {
          "column_count": 13,
          "columns": [
              {
                  "Name": "Number",
                  "Index": 0,
                  "Type": "Integer"
              },
              {
                  "Name": "Name",
                  "Index": 1,
                  "Type": "String"
              },
              {
                  "Name": "BaseKV",
                  "Index": 2,
                  "Type": "Float"
              },
              {
                  "Name": "Type",
                  "Index": 3,
                  "Type": "Integer"
              }
          ]
      },
      "LOAD": {
          "column_count": 18,
          "columns": [
Regarding this JSON file:
The column_count for each named table should match the number of comma-separated values in the rawfile, but not each CSV must be used.
The columns array for each named table specifies each CSV used in the translation:
Name should match the rawfile documentation, but it only needs to be unique within columns for this table.
Index is the zero-based position of this value in the CSV row.
Type should be Integer, String, or Float.
New importer features should begin with changes to this JSON file.
Regarding the API functions that use the JSON file:
load_raw_meta reads the JSON file and returns a Python dictionary of its contents. This function is usually not called directly and its code may not require changes.
load_rawfile reads the rawfile and returns a Python dictionary of its contents. It calls the previous function. This function’s code, and some helper functions that it calls, should be updated to support new features in raw_mapping.json.
print_raw_table displays a named rawfile table from the Python dictionary of its contents. Use this for guidance on how to use the rawfile contents in Python code. This function’s code may not require changes.
To use the new importer features, some of the API functions should also be updated:
Check create_rdf for changes needed in RDF implementations.
Check create_sql for changes needed in SQL implementations.
To add other types of text file importer, i.e., something other than rawfile:
Ensure the file extension is unique, e.g., EPC, AUX, DGS.
Create an appropriate JSON configuration file for the newly supported file extension.
Add API functions as needed to support the new file extension.
Add a small calling program for the new file extension. Currently, only raw_to_rdf.py is provided in the Repository src/emthub/examples subdirectory. A script like this should be provided to create CIM RDF and possibly CIM SQL from the new file extension.
Consider adding dynamics model support following the roadmap for Dynamics Model Maintainers.
Dynamics Model Maintainers
This roadmap applies to stakeholders that add or update entries to be supported in NthAmDynamicModel. This may include power system phasor domain transient (PSPDT) developers, EMT developers, or others familiar with the underlying PSPDT text file formats.
Users Roadmap is a pre-requisite.
Access to at least one EMT simulation tool is a pre-requisite.
Examine the format of detailed_model_types.json in the Repository src/emthub/queries subdirectory. This will be referred to as the configuration file.
Find the applicable section in the configuration file that you wish to modify. The current choices are AUX, DGS, DYD, DYR, and Other. The last choice is really intended for user code models in local settings. New choices can be added by Profile Maintainers as needed.
To correct an existing configuration file entry, you should first edit the file and test the changes locally.
Warning
Do not change any existing mRID values found in the configuration file. These are shared globally by all users of this package. Changes to the mRID could break existing models for all those users.
To test these relatively simple changes, you should have a PSPDT text file that references the changed dynamics model type. Follow a typical users process of importing the text files to CIM RDF, exporting for EMT simulation, running the EMT model in at least one tool, and verifying the EMT outputs are correct.
Also verify the documentation will update correctly, by invoking make html in the repository docs subdirectory.
After a good local test, commit your changes to the repository via a pull request. After the pull request has been approved and merged, the next release will include your changes.
To add brand new models to the configuration file, some additional steps are needed. The overall framework of local testing and pull request still applies, but each new entry for the configuration file should consider the following:
Find the correct section in the file. See NthAmModelNameKind for valid choices.
Add a model entry with name that matches the PSPDT file format’s “model type” keyword.
Create a random UUID4 to become the new mRID for this new entry. Many tools and scripting library functions are able to create a random UUID4. Once created and saved in the configuration file, this mRID should never change. It should be maintained in the package to guarantee persistence.
Add a description.
Review the standard controller models in CIM dynamics, and identify the closestStandardModel. There may not be an exact match, but if there is a relatively close match, that should be provided as a starting point for a future migration from PSPDT text file models to the standard CIM models. Chances are, the developer adding this model to configuation file is best positioned to identify the closest match.
Specify nameKind to match the file section. See NthAmModelNameKind for valid choices.
Specify the modelKind for the expected application. See NthAmModelKind for valid choices.
Specify the statusKind for allowability in North American interconnection studies. See NthAmModelStatusKind for valid choices.
Provide an array of parameterDescriptors, one for each value found in a “row” or “line” for this model in the PDPDT text file. Each descriptor should have:
name, which should match the name given in PSPDT documentation.
mRID, to be generated randomly and then maintained under version control for global persistence.
typicalValue, if available. This may help in specifying the default value in a future migration to closestStandardModel.
engineeringUnit, if available. This may help in specifying the correct CIM data type in a future migration to closestStandardModel.
sequenceNumber, starting with 1, which should match the order expected in the PSPDT text file.
For illustration, a reduced-size version of the original configuration file follows.:
{
  "AUX": {
  },
  "DGS": {
  },
  "DYD": {
  },
  "DYR": {
    "SEXS": {
      "mRID": "854A4288-2FB4-47F9-A194-395CF22DD4E8",
      "description": "Legacy static exciter",
      "closestStandardModel": "ExcSEXS",
      "nameKind": "DYR",
      "modelKind": "excitationSystem",
      "statusKind": "prohibited",
      "parameterDescriptors": [
        {
          "name": "Bus",
          "mRID": "5FEC78BC-65D5-49CE-9D30-EA7F3D225EEF",
          "typicalValue": "",
          "engineeringUnit": "Integer",
          "sequenceNumber": 1
        },
        {
          "name": "Model",
          "mRID": "8C11F175-B4E3-49A7-91C5-7396992785F8",
          "typicalValue": "",
          "engineeringUnit": "String",
          "sequenceNumber": 2
        },
        {
          "name": "ID",
          "mRID": "A55C670D-7976-40C8-8A33-5A332070D53E",
          "typicalValue": "1",
          "engineeringUnit": "String",
          "sequenceNumber": 3
        },
        {
          "name": "TATB",
          "mRID": "360A2A9E-48B2-49FA-83F5-5518A4E16F81",
          "typicalValue": 0.1,
          "engineeringUnit": "Float",
          "sequenceNumber": 4
        },
        {
          "name": "TB",
          "mRID": "1FAE8B08-8F08-4773-AD98-AB0360E820EF",
          "typicalValue": 10.0,
          "engineeringUnit": "Seconds",
          "sequenceNumber": 5
        },
        {
          "name": "K",
          "mRID": "1D4EF184-08B1-4633-BA51-0C3A121FDF94",
          "typicalValue": 100.0,
          "engineeringUnit": "PU",
          "sequenceNumber": 6
        },
        {
          "name": "TE",
          "mRID": "0FAB61D9-EF26-4BCB-94FE-A19CBE2F3945",
          "typicalValue": 0.05,
          "engineeringUnit": "Seconds",
          "sequenceNumber": 7
        },
        {
          "name": "EMIN",
          "mRID": "8C71701D-5C80-4E16-A5DB-9356BCB91854",
          "typicalValue": -5.0,
          "engineeringUnit": "PU",
          "sequenceNumber": 8
        },
        {
          "name": "EMAX",
          "mRID": "87E5FD37-97F8-4DE7-B23E-C3EA78AFF8FF",
          "typicalValue": 5.0,
          "engineeringUnit": "PU",
          "sequenceNumber": 9
        }
      ]
    }
  }
}
After updating the configuration file, some of the API functions should also be updated:
Check create_rdf for changes needed in RDF implementations.
Check create_sql for changes needed in SQL implementations.
The functions in cim_support should not require changes, even in functions having dyr in the name.
DLL Developers
This roadmap applies to stakeholders that primarily build DLL models of IBR and other controllers. This includes IBR hardware vendors, their consultants, researchers, and EMT software developers who are building test cases.
Users Roadmap is a pre-requisite.
Run all six DLL Examples.
The examples in this repository and the DLL interface specification all contemplate using the C language and Windows tools for developing DLLs. However, any language that can produce a DLL may be used, including but not limited to Fortran and Pascal. Furthermore, a “DLL” may be produced for other operating systems, under a name like “dylib” or “so”, for EMT simulators that might run on those other operating systems. It should be possible to localize the different build environments for a DLL through a cross-platform CMakeLists.txt file, and by including system-dependent header files at the top of the DLL source file.
One example in this repository uses Modelica to generate C code, which is then compiled and linked to produce the DLL. There are other software tools available that have C-code generators. This allows a developer to produce the DLL without writing C code from scratch. When the reference controller model has already been implemented in another software tool that has code generation, this path is likely to save time and improve the model fidelity.
DLL developers should consider participating in IEEE P3597, or at least observing its activity.
The DLL should be tested in at least one EMT simulator before publicly releasing the DLL. A few examples in this repository connect the DLL to a simple grid equivalent source, but that’s not sufficient for testing. Those examples also use an EMT solver for testing the DLL.